Monday, August 29, 2011

Hello Doily

Love this stamp! My mother told me this pattern was called a pineapple and I can remember her crocheting doilies just like it.

I stamped the image onto Whisper White cardstock with Versamark and then embossed with Clear EP. I used two images from the Delicate Doilies stamp set to stamp the small doilies in Wisteria Wonder. Once this was completed I sponged the edges, again using Wisteria Wonder, and then mounted on Elegant Eggplant. I added the Wisteria Wonder Ruffled Ribbon and mounted the whole thing on a Wisteria Wonder cardstock base.

I sometimes wish I could sit in on a Stampin' Up! planning meeting when they are throwing names around for their new ink colors. I really think it could be fun. I'd love to be there and join in, but I'm sure I would probably get into trouble with some of the names I might throw out there. LOL!

Thanks for stopping by today.

Thursday, August 25, 2011

Delicate Doilies

The Delicate Doilies and Hello Doily stamps remind me of the beautiful doilies that my mother used to crochet. She always used a really fine thread to make the doilies and the hook on the crochet hook was almost invisible. I honestly don't know how she did all that extremely fine work. I had a few of the small accent pieces she made, but when she died my cousin gave me a tablecloth mother had crocheted for her. Jeannie, I can't begin to tell you how thankful I am to have it and how much I appreciate you giving it to me.

Mother has been gone for a little over 9 years now and I miss her. We had our difficulties over the years but I loved her and I'll miss her until we meet again. For those of you who still have your mothers, appreciate them and show them you love them because they will be gone way too soon.

We made this card in class earlier this month at the Jacksonville Beach Senior Center and the ladies each made it their own by coloring the doilies in different manners. I chose Calypso Coral, Lucky Limeade and Basic Black for the colors on this Delicate Doilies birthday card. The doilies were colored with Stampin' Write Markers and I used the new Calypso Coral Ruffled Ribbon. Although you can't see them in the photo, the doilies each have a rhinestone in the center.

Don't you just love the new Petite Pairs stamp set from the 2011/12 Idea Book & Catalog? I think this set really filled a void in the Stampin' Up! sentiment area. I just wish there was a small "get well" pair as well. Keeping my fingers crossed!

See you soon.

Sunday, August 21, 2011

Love & Care

Another card share today using the Love & Care level 2 hostess set. This time I used the aster type single blossom. The image was stamped into Daffodil Delight and then rock 'n' rolled into Pumpkin Pie. Once that step was completed I went over the center of the flower with a Chocolate Chip Stampin' Write Marker. The single leaf was stamped with Pear Pizzazz and scattered among the flowers. A double-loop bow completes the look. Hope you like it as much as I do.

Thanks for taking the time from your busy day to stop in.

Thursday, August 18, 2011

Love & Care

The level 2 hostess set called Love & Care in the current Summer Mini catalog is a very versatile set especially if you love floral images (and I do). There are so many things you can do with these flowers.

The flower here was colored with Stampin' Write Markers in Rose Red and a little Bravo Burgundy was added for depth. The stem is Always Artichoke. Cardstock is Always Artichoke and Rose Red with a dash of Paisley Petals Designer Paper. I added three dark pink rhinestones from my stash and TA DA! the card is done.

See you soon.

Sunday, August 14, 2011

Fabulous Florets Yet Again

See, I told you I love it. The greenery stamp was used again, but I changed it up with a different flower and, if it matters, it's turned on its side. I even changed the colors to Pear Pizzazz and Poppy Parade.

Just wanted to quickly stop in and share this card, but I gotta run now.

See you all again.

Thursday, August 11, 2011

Fabulous Florets

Love, love, love the Fabulous Florets stamp set. I can't even begin to tell you how many times I have used it. I'm sure my class attendees are thoroughly sick of it, or will be soon.

I embossed the greenery with Wild Wasabi embossing powder onto Basic Black cardstock and then embossed the flower with White embossing powder onto Daffodil Delight, cut it out and popped it onto the greenery. The Vintage Wallpaper embossing folder was used on Marina Mist cardstock and then it's all topped off with a Daffodil Delight satin bow.

Thanks for stopping in today.

Sunday, August 7, 2011

Inspired by Nature 2

Today I'm using the other side of the Inspired by Nature double-mounted stamp set. I colored the flowers with Daffodil Delight, Pumpkin Pie, Old Olive and Early Espresso with Stampin' Write Markers and then misted the stamp with water. I really wanted a watercolor type image but I used Whisper White cardstock to stamp my image onto and am not quite happy with the result. I think I will use watercolor paper on my next attempt and see how that turns out. Cardstock is Daffodil Delight and Early Espresso and the ribbon is Daffodil Delight 3/8" taffeta.

See you again soon.


Thursday, August 4, 2011

Inspired by Nature

I recently returned from a visit to my hometown of Pittsburgh, was driving through West Virginia, and fell in love with all the wildflowers that were scattered along the highway. I know they were planted there on purpose to beautify the medians, but it looked like they were just growing there naturally. Such a wildly colorful display!
Today's card was inspired by those wildflowers and was done with the Inspired by Nature double-mounted stamp set. The sentiment is from a retired level 2 hostess set called Something to Celebrate. Little butterflies from the Beautiful Wings Embosslit Die are fluttering throughout the field of wildflowers. I used Tempting Turquoise and Concord Crush cardstock as the base for my garden.
I'm glad you came back for a visit. Please stop in again soon.

Monday, July 18, 2011

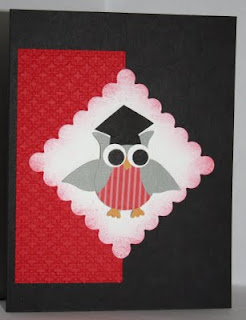
Graduation Owl

I recently made a card similar to this for a dear friend's daughter to celebrate her high school graduation. The only difference was that her owl had a rolled diploma attached to the wing. Congratulations Gracie!

Stampin' Up! makes it so easy to create cute cards like this using their punches. I used the Owl Builder punch and the wings from the Bird Builder punch to create my graduation owl. I drew a sample pattern and then hand cut the graduation cap from that pattern. I hope you enjoy my feathery friend too.

Thursday, July 14, 2011

Happy Birthday With a Cherry on Top

This card was so easy to create using the Cupcake Builder and Petite Pennants Builder punches from Stampin' Up! I recently made this card at my senior class and all the ladies loved it.

I used one of the images from the Pennant Parade for my ice cream cone and punched it out with the Petite Pennant Builder punch. The ice cream scoops were made using the Cupcake Builder punch. The sentiment is from A Word For You. I was so happy to see that this stamp set was continued over into the new 2011/2012 Stampin' Up! Idea Book & Catalog.

Thanks for stopping by again today!

Monday, July 11, 2011

On The Grow Mason Jar


I can just picture this mason jar sitting on my grandma's kitchen table with freshly cut flowers from her garden.

This image is from On The Grow in the Stampin' Up! Summer Mini Catalog from which you can purchase until August 31, 2011.

I stamped the image onto watercolor paper and colored it using Melon Mambo & Garden Green reinkers and an Aqua Painter. I used a very light touch of Bashful Blue on the mason jar and then covered it with Crystal Effects. I was very happy when I saw that my photo actually shows the glassiness (is that a word?) LOL! that I was looking for.

The papers used are Melon Mambo, Garden Green, Whisper White and Melon Mambo from the Patterns Designer Series Brights Paper Stack.


Friday, July 8, 2011

Fabulous Florets Greenery

I was inspired to make this card by one on another artist's blog, but can't locate their website again to give them credit. I'll have to be better about keeping that information.

I used the greenery from the Fabulous Florets stamp set. The greenery was stamped in Pear Pizzazz and then rock 'n' rolled in Soft Suede. I did this twice on my background and then stamped another on a scrap piece of white and cut it out and mounted onto the center of the other two images with dimensionals. I also used the leaf image from Fabulous Florets and stamped in Versamark onto the Pear Pizzazz card to add a little interest to the plain background. The Scallop Edge Border punch was used to punch the Soft Suede cardstock and then a Pear Pizzazz strip was added using the Dotted Scallop Ribbon Border punch.

Monday, July 4, 2011

Watercolored Flower Garden


I love this Flower Garden embossing folder. I did this one on watercolor paper and colored it with Rich Razzleberry and Old Olive reinkers using an Aqua Painter. The centers of the flowers were done with a black gel pen I had in my stash. The gel pen gives the centers a shiny black embossing powder look. The watercolored image is mounted on Old Olive cardstock and then mounted onto a Rich Razzleberry card. I can't wait to try this technique in other colors.

Thanks for visiting!

Happy Independence Day

I recently went to a weekend scrapbooking crop with several friends. Just like me, one of these friends was working on cards. She was making a terrific quilted card and I asked her to share the technique with me. I used Stampin' Up! Woodland Walk DP, Crumb Cake cardstock and the bonsai tree from the Plant Hope stamp set. Thank you Vickie for sharing this technique with me. I can't wait to try some of the new 2011/2012 DP using this fabulous technique.
Thanks for taking the time to stop by today.

Friday, March 11, 2011

I'm Back!!!


I honestly don't know where the last month and a half have gone. It seems the older I get the faster it goes. My husband had surgery again at the beginning of February so that explains part of my absence but not all of it. I guess you can put the other part down to plain old blog neglect and I apologize for that. I hope you don't hold it against me.
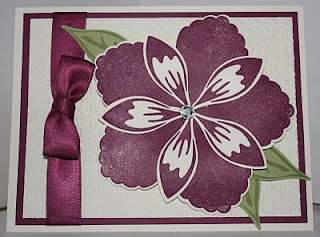
I am sharing a card today that was done with the Build a Blossom set from Stampin' Up!. I used Pretty in Pink as the flower base and stamped the petals in Rose Red. I absolutely love this set because it makes such pretty flowers so easily. Don't forget this set is in the current mini catalog and will only be available until April 30th so if you want it you better place your order soon.
I promise I'll be posting again soon and hope that you check back in with me. Thanks so much for visiting.

Thursday, February 3, 2011

Nature Walk


Nature Walk is another of the stamp sets from the current Stampin' Up! Occasions Mini Catalog.

I colored directly onto the flower stamp using Rose Red and Always Artichoke Stampin' Write Markers and then stamped the image three times without reinking. The embossed background was done using the Vintage Wallpaper Embossing Folder. These embossing folders make a beautiful background so easy.

Thanks for taking time out of your day to visit. See you again soon.


Saturday, January 29, 2011

Build A Blossom

Today's share is one of the cards I did at my monthly class held at Cha Cha's Mexican Restaurant. I just love the Stampin' Up! Build A Blossom stamp set from the current Occasions Mini Catalog. The ladies at class all agreed with me and every single person there purchased the stamp set and punch.

This stamp set has a coordinating punch that enables you to make this beautiful flower very easily. Stampin' Up! has really thought of everything with this release. Can't you just imagine all the beautiful cards you can create with this?

I hope you enjoy my card and if you would like to get the supplies to make your own just click on my signature below to go to my Stampin' Up! online store.

My next monthly class at Cha Cha's will be February 26th at 10 AM. Why not come out and join us for a fun get together.

Thanks for stopping by today.